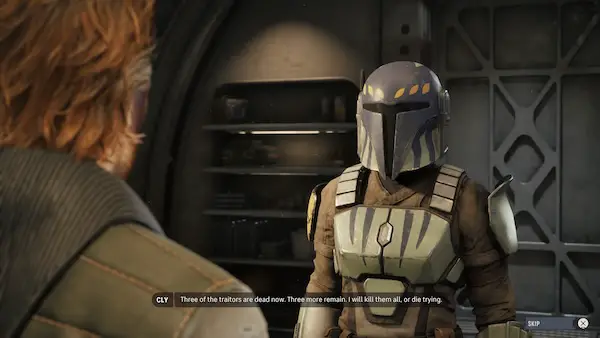
Without Honor or Humanity is the second of Cly Kullervo’s two hero missions, and it is the one that explains why she joined your company in the first place. It sends you to Serolonis, Zone Herf, to assassinate a Coil-aligned Mandalorian named Kervis Akali. It came up for me at cycle 36, which fits the cycle 35 to 36 window other listings give it.
Here is the part that matters before anything else. If you recruited Cly, this mission is not optional. It is reclassified as a critical mission, and it has a one cycle window, the shortest in the game and the same as a crisis mission. There is no deferring it, no coming back when your roster is healthier, no waiting for a better week. When Cly names a mark, you go.
BEFORE YOU LAUNCH
Save first. I cannot stress this enough, and it has nothing to do with whether you are good at the game.
Three things stack here in a way that can cost you more than one failed attempt. Cly is subject to permadeath despite being a story character. Both Cly and Hawks are required operators on this mission, and the mission fails if either one is killed. And the window is a single cycle, so a wipe does not just cost you the attempt, it can cost you the character, the mission, and The Mandalorian achievement that requires both of her missions for one hundred percent completion.
Every source I checked lists only “Cly must survive” for this mission. Hawks being a fail condition as well is not documented anywhere, so plan your positioning around protecting two units, not one.
MY SQUAD PROBLEM, AND WHY IT IS WORTH MENTIONING
I went into this at high difficulty battle with the wrong team, and not by choice.
My main healer picked up an injury in the previous battle. Injuries take time to clear, and this mission does not give you time. So my ideal setup, the one I had spent cycles building around, simply was not available. I moved to my second healer, looked at the fight again, and decided that was not going to be enough either. In the end I pulled the backup healer entirely and brought Jae instead, assigned healing as her secondary profession, and equipped her with stims and bacta.
That improvised answer worked, and the reason it worked is worth knowing. Jae’s execution ability triggers a finishing shot off an ally’s attack, and that follow-up damage is what killed roughly half the field. If you are choosing between a dedicated healer and a unit that brings a damage trigger, on this map the trigger is the stronger pick, because the fight is long and the enemies have deep health pools.
One thing to watch if you do the same: Cly’s starting bonds with Jae and Hawks are both at the bottom of her table, and on Hard and above they start a tier lower still. I never saw the game refuse me anything because of it, and Hawks and Jae chained their execution combo all fight. But I never once saw that combo trigger off Cly’s attacks either, and I do not know whether that is the bond system at work or just how the ability is written. If you run this with a friendlier roster, that is the thing to test.
Without Honor or Humanity – WHAT YOU ARE UP AGAINST
The opening dialogue ends with a line about needing luck, and then you find out something the briefing did not tell you. Kervis and his followers are plague infected. One of the Coil units carries an ability called Plague Miasma. This is not just flavour, and it connects this mission to the wider plague thread the game picks up elsewhere.
The field breaks down roughly like this.
Three Mandalorian bosses, running somewhere in the region of two hundred to two hundred and fifty health each. Kervis himself started at about two hundred and fifty. These are the health pools that make the fight long. They also get multiple attacks per turn, which sounds worse than it is, because their accuracy is poor.
A Coil Seer, with a much more reasonable health pool. This is your first target, and I will come back to why.
A Coil Guardian, which is tougher and more heavily protected than the Seer.
Reinforcements, in two separate waves, from two different directions. More on those below, because the trigger is the most important thing in this entire mission.
THE TWO MECHANICS THAT ACTUALLY DECIDE THIS FIGHT
Everything difficult about Without Honor or Humanity comes down to two mechanics. Handle them and the fight is manageable even at Extreme with a patched together squad. Miss them and you will lose turns you cannot afford.
The first is retaliation. These enemies hit back when you attack them. Walking a unit up and trading blows is how you bleed health across a long fight, and with two units that end the mission if they die, that is not a trade you want to make repeatedly.
The second is the drain effect, and it is the one that genuinely hurt me. On my very first move I attacked a Coil unit, got drained, and lost Cly’s AP for the turn, leaving her standing exposed in the middle of the enemy group. It happened to her twice across the fight. This is a real counter to your best operator, not an inconvenience, and it is the main reason my opening turns went badly.
There are two ways to handle it, and the second is better than the first.
The first is to work around it. ElectroWeb Dart, ElectroWeb Surge and Combat Jump all cost Advantage rather than action points, so they are your way of getting something out of Cly on a turn where the drain has already landed. Keep those in mind rather than writing the turn off.
The second is to not let it land on her at all. The drain comes off attacking into it, so send somebody else in to take the hit. Have another operator make that attack, let them absorb the drain, and keep Cly’s turn intact for the damage you actually need her to do. Losing a turn from a support unit costs you very little. Losing Cly’s costs you the tempo of the whole fight.
Without Honor or Humanity – HOW TO PLAY THE FIGHT
Kill the Coil Seer first. It has the smallest health pool on the field and it is where the drains are coming from. Three two-hundred-health Mandalorians are a damage race you can afford to be patient about. Something deleting your turns is not. Take the cheap kill that stops the bleeding.
Then take the Guardian, and lead with Surge rather than blaster fire. Surge ignores Defense, which makes it the right tool against anything armoured.
Your core loop for the rest of the fight is dart, jump out, then surge. Surge detonates around Cly and around every darted enemy, which means the damage lands at their positions whether or not she is standing in the middle of them. So tag your targets, jump Cly back to safety with the jetpack, and detonate from cover. There is nothing adjacent for the enemy to retaliate against, which solves your retaliation problem and your exposure problem in the same action.
Hold Combat Jump as an escape tool rather than spending it for the burn damage on the way in. It costs two Advantage, repositions Cly and pushes enemies off her, and the turn you need it is the turn she gets focused.
Set up your execution triggers deliberately. Get a target low, then attack with the unit whose follow-up will finish it. I closed out multiple enemies this way, including Senla Bonni, who I had worked down to twelve health before the finishing attack landed.
Keep your group close enough for Jae’s morale boost to reach, but be aware that morale boost also spends Advantage, so it is competing with Cly’s abilities for the same resource.
And watch your charges. A secondary profession healer running stims and bacta has a fixed number of uses. Do not spend them on chip damage early.
THE REINFORCEMENT TRAP, AND WHY THIS MISSION PUNISHES THE OBVIOUS PLAY
This is the finding that matters most, and it is why you should not simply rush the boss.
Reinforcements do not arrive when Kervis dies. The first wave came as I cleared his escort down to the last two Mandalorians. The second wave triggered off landing damage on Kervis himself, with three enemies arriving from the left and one from the right.
If you have played Best Served Cold, Cly’s first mark, you will walk in with exactly the wrong instinct, because that mission spawns its reinforcements on the target’s death. Here, hurting the target is what calls in the room. Burst Kervis down quickly and you are fighting his escort, two reinforcement waves and the boss all at once.
The better line is to clear the support units first while the field is still quiet, accept that Kervis is a long fight, and keep something in reserve for the waves. I would call this a damage threshold rather than a turn timer, but I only have the one run to go on, so treat that as a reasonable reading rather than confirmed.
Note also that killing Kervis does not end the mission. The objective stays on Defeat the Coil Forces, and I still had three Coil units to clear after he went down.
A GLITCH TO WATCH FOR?
Late in the fight, one of the Coil units, the one carrying Plague Miasma, ended up hovering on top of a wall where I could not attack it.
I was lucky, and the fight resolved without it blocking me. But think about what that bug could cost you in a different run. The final objective is Defeat the Coil Forces. If an unattackable enemy is the last one standing, in a one cycle critical mission with permadeath on the table, you have a genuine problem.
If it happens to you, do not save it for last by default. Try to reach it while you still have other targets as a buffer. Combat Jump is your only vertical tool and may get you line of sight from elevation. A dart on a nearby enemy followed by Surge may catch it, since the blast is positional rather than targeted. Thrown explosives aim at ground rather than at a unit, which sometimes reaches what direct attacks cannot. And if none of that works and the mission hangs, restart from the menu rather than burning the cycle.
Without Honor or Humanity REWARDS
An Exotic Mark IV Flamethrower, four thousand credits, one focus point for the whole team, and one hundred and fifty Den level.
Worth noting that published listings for this mission do not match what actually paid out. The wikis list Roster XP and an Intel reward, where my results screen showed credits and Den level with no Intel at all. Go by your own screen.
SO IS IT HARD?
Honestly, no, and I say that having gone in at Extreme with my best healer on the bench and a non-healer improvised into the role.
The difficulty is not in the numbers. It is concentrated in two mechanics that punish your instincts. Retaliation makes you pay for trading blows, and the drain will take Cly’s turns away from you if you let her be the one walking into it. Once you are sending someone else in to absorb the drain and detonating Surge from cover instead of standing in the middle of it, the fight becomes a long but steady grind through some deep health pools.
—————————————-
SPOILER WARNING: THE STORY BEAT
Everything below discusses how this mission resolves. If you have not played it, stop here.
—————————————-
Every source on Cly Kullervo describes the people she is hunting as her mysterious marks and leaves it there. The official databank will tell you she is one of the last of the ancient Clan Verminoth and that she joined your company purely to further a quest for revenge. It will not tell you who she is hunting or why.
This mission tells you. As she finishes him, Cly reveals that Kervis Akali was her husband.
The game withholds that until after you have helped her kill him, which recasts the whole mission in retrospect. You are not assisting a bounty hunter with a contract. You are the instrument of something a great deal more personal, and you find out once it is already done.
It also makes sense of the title. Without Honor or Humanity reads like a description of Kervis twice over, a Mandalorian who broke the code and a man hollowed out by the plague. That is my reading rather than anything the game states outright, but once you know who he was to her, the title is doing more work than it first appears.
And it reframes what the irreversible decision in this mission actually is. There is no choice at the kill. No prompt, no branch, no option to spare him. The decisions that determined this outcome were all made earlier and elsewhere: recruiting Cly in the first place, which turned both of her missions into critical path content, the one cycle window that would not let you wait for a healthier roster, and the injury you could not heal in time. By the time you learn what this mission is really about, every decision that mattered is already behind you.
Which is, when you think about it, the most honest thing this game has said about revenge.